
There it is. The baby shower gift I looked forward to the most to give, has arrived on its destination! For me it was the greatest gift to give, I can't judge if it was the greatest gift to receive also ;). Last Sunday my nice-or-nephew-to-be decided to let us know he is a nephew and his birthday would be the 8th of February. Last couple of weeks I was busy making a 'basket' with baby stuff. Finally I didn't make the basket itself anymore. The baby stuff I did make: A changingmat, stuffed animal, bib and booties. All of them in a Zealandish theme. In every project I used Zealandish schortenbont.

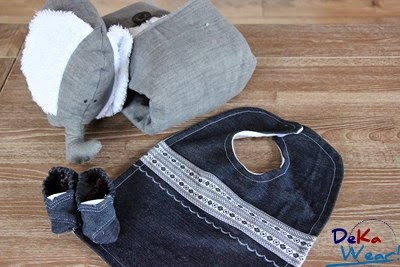
De slofjes - The booties
Het patroon voor de slofjes vond ik, via Pinterest, hier. Ik gebruikte jeansstof voor de buitenkant en zwarte katoen voor de binnenkant. Een strookje schortenbont kwam op de achterkant (niet op de foto's). Het maken van de slofjes viel wat tegen. Dat kwam voornamelijk door de stofkeuze. Deze slofjes kan je blijkbaar beter maken van dunnere katoen. Jeans is dik en stug en de babyslofjes klein. Het werd dus nogal een gepruts, maar het is uiteindelijk toch gelukt.
I found the pattern for the booties here, via Pinterest. As outher fabric I used denim, for the lining I used black cotton. At the back I added a piece of schortenbont (not in the pictures). Making the booties wasn't as easy as I had hoped. The main reason for this was my choice in fabric. I guess the booties are easier to make with thinner cotton. The denim was thick and rigid and the baby booties are tiny. It was a bit of tinkering, but I finally made it.

De slab - The bib
Voor de slab tekende ik een patroon aan de hand van een slab uit mijn eigen collectie. Ik maakte de voorkant van jeansstof en de achterkant van tricot. Voor ik deze delen aan elkaar stikte, naaide ik op de jeans een strook schortenbond en een sierstiksel. Het samenvoegen van de voor- en achterkant was nog niet zo eenvoudig. Tricot en jeans samen is geen handige combinatie: De tricot rekte ontzettend, de jeans was stug en rekte dus absoluut niet. Ik had dus beter voor katoen of iets dergelijks gekozen als achterkant. Uiteindelijk ben ik toch tevreden met het resultaat. De slab sluit met klittenband in de nek.
The pattern for the bib I drew after a bib from my own collection. The front of the bib is made of denim, the back is tricot. Before sewing these parts together, I sewed a strip schortenbont and a lockstick on the front. Sewing the front and back together wasn't easy. Tricot and denim isn't a handy combination. The tricot was very stretchy and the denim absolutly not. Choosing cotton for the back would be a better idea. Finaly I'm happy with the result. The bib closes with velcro on the back.

De knuffel - The stuffed animal
De olifant maakte ik al eerder. Het patroon vind je hier (Pinterest). Hiervoor gebruikte ik dunne, rekbare denim (lijf), badstof en schortenbont (oren). Op de poten borduurde ik de initialen van mijn neefje en zijn geboortedatum.

The elephant I made before. The pattern can be found here (Pinterest). I used thin strechy denim (body), terry and schortenbont (ears). I embroidered the initials of my nephew and his date of birth on the legs.

De verschoningsmat - The changingmat
De verschoningsmat is een mix van deze (pin) en deze (pin) tutorial. Ik gebruikte de afmetingen van de tweede tutorial, al maakte ik de bovenkant helemaal recht. De zak naaide ik er ook los op. Dit deed ik voor ik de badstof aan de denim naaide, zodat je de naden van de zak niet aan de buitenkant ziet. Voor ik de zak erop stikte, maakte ik een applicatie van schortenbond en naaide ik een strook schortenbont tussen de voering en de buitenkant van de zak. Bovenin maakte ik een lusje van elastiek en achterop de mat (net boven de zak) zit een knoop. Zo kan je hem opvouwen en meenemen.
For the changingmat I combined this (pin) toturial with this(pin) tutorial. I used the sizes of the second tutorial, but made the top straight. I sewed the pocket seperatly on the mat. I did this before sewing the terry and denim of the mat together, so you can't see the stiches on the outside of the mat. Before doing this, I sewed an application on the pocket and added a strip of schortenbont between the outer fabric and the lining. At the top I made a little loop with an elastic and at the back of the mat (just above the pocket) I added a button. So the mat can be folded.

Ik heb echt veel plezier gehad in het maken van dit setje. Alleen al omdat ik het voor mijn (favoriete) neefje heb gemaakt! Ik hoop dat hij er ook plezier van zal hebben ;).
Wat is jouw favoriete cadeautje om als kraamcadeau te maken? En wat vond jij het leukste cadeau om te geven?
I realy enjoyed making this set. Just making this for my (favorite) nephew was so much fun! I hope he wil enjoy it to ;).
What is your favorite baby shower gift to make? And what gift did you enjoy the most to give?

Helaas niet veel geboortes meer in vriendenkring en familie, dus ook geen kraamkado's :-(. Maar het lijkt me wel superleuk om zo'n hele set bijeen te naaien, heel mooi gemaakt!
BeantwoordenVerwijderenDank je wel Nat. Het was zeker erg leuk om te maken, helemaal omdat het voor (de baby van) mijn zusje was! :)
Verwijderen